

This is a comprehensive guide to how to set up a Google places listing for your business. It is completely free to do and although this doesn't affect your SEO directly it will definitely play a useful role in your overall online marketing. By having your company's location visible to the general public you will also find that for the majority of time google listings show at the top of Googles search pages which again is beneficial.
Creating A Google Account
First things first, creating a Google account. A Google places account can't be created without a Google account which means if your existing email isn't a Gmail account then you'll need to create one. The good thing is you only need to use this Gmail address for the google listing so don't worry about any other email you have, you can still use them as you normally would. 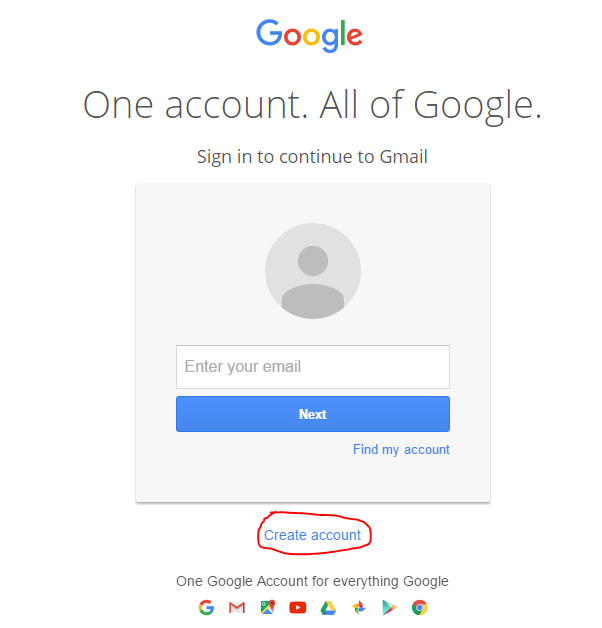
To set up a Gmail head to gmail.com, once here you will be presented with a sign-in page. Click on the "Create Account" button shown in the picture above to begin creating your Gmail address. 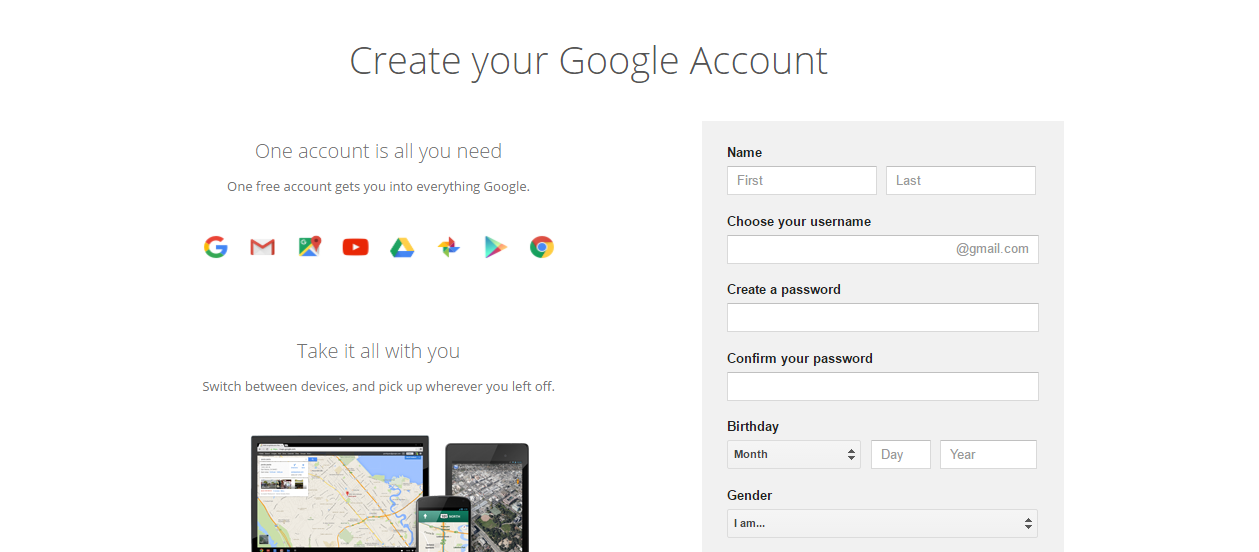
This page is where you enter all of the necessary information needed to create the account. You need to enter all of the usual info here such as name, email username, password etc. but you can leave the optional "mobile phone" and "Your current email address" out if you would rather not provide these details. Now click "Next Step".
You'll be presented with a welcome screen to your Gmail account and now you're all set to begin your Google places listing.
2. Setting Up Google Places 
To begin the setup first head to Google Places, once on this page click on the big "Start Now" button displayed on the middle of the page or at the top right-hand corner. This will direct you to the Gmail login page which is where you would sign in with the Gmail account you created earlier (If you are already logged in to your Gmail prior to setting this up you will skip the login page and head straight through to the setup process.) 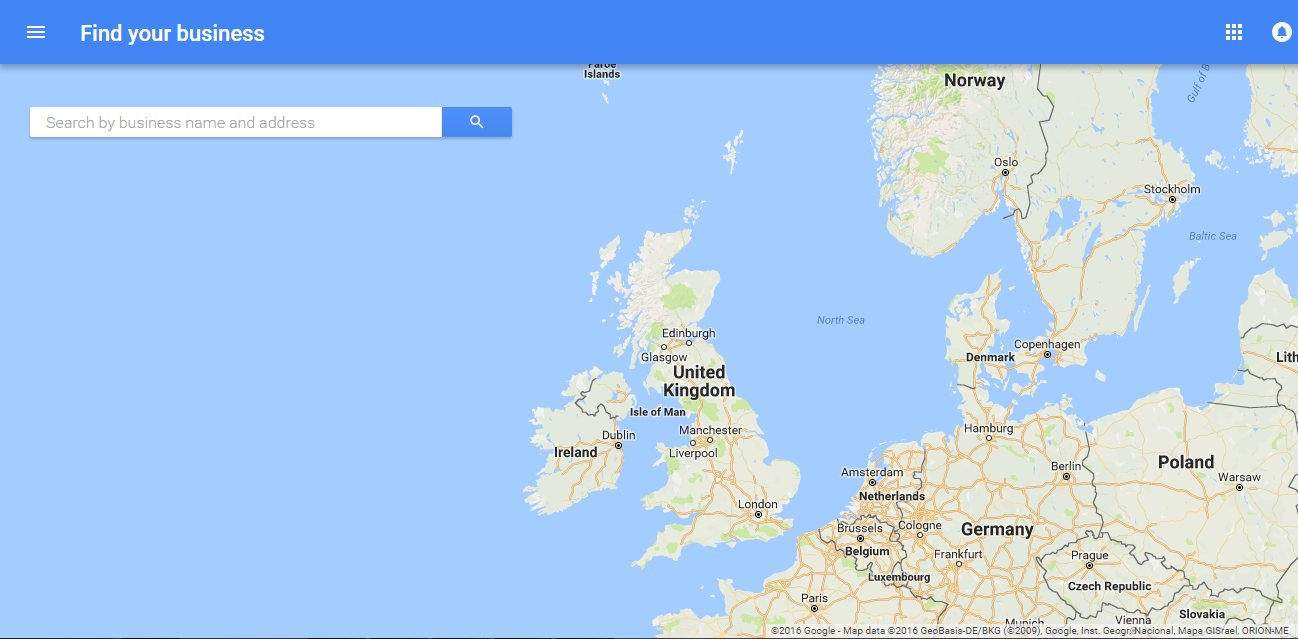
In this particular setup, I will be creating a map listing for a coffee shop in Glasgow called "Wide Awake Coffee Shop". Although this won't relate to your business directly the process I go through here is the same steps for any business sector so be sure to follow this guide like it is your own listing. The first stage is to just simply type in the name of your business and click "search". This will search through the many businesses on google places and bring up a list of any that are of a similar name to yours. 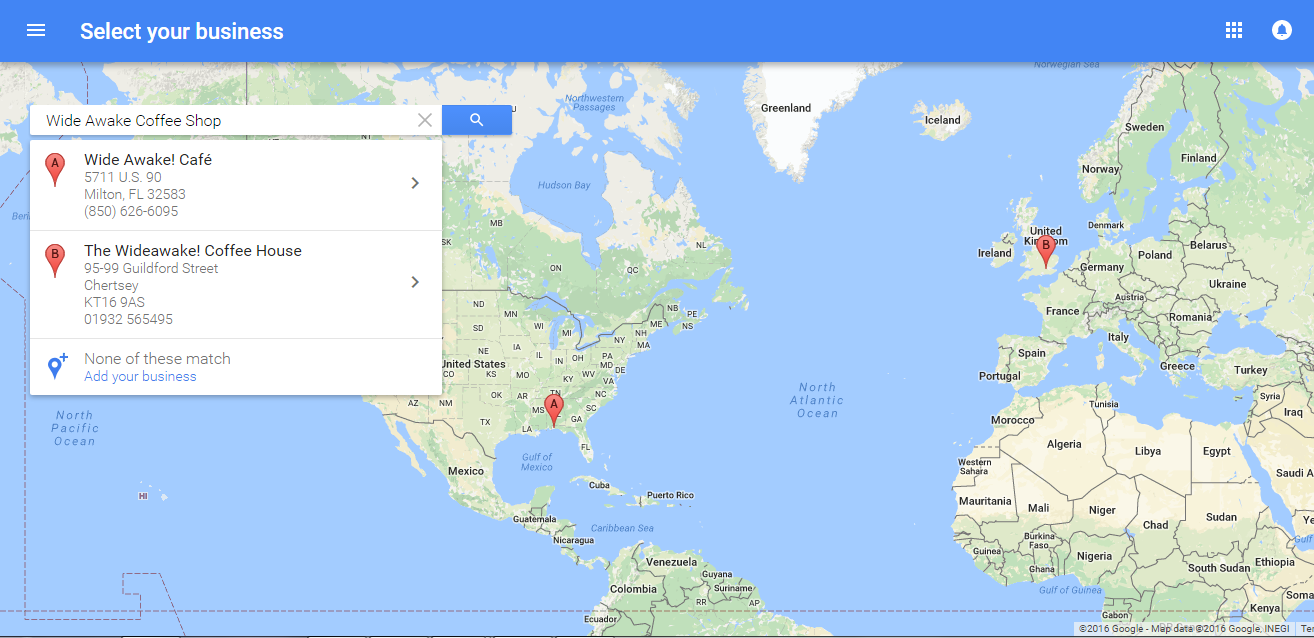
If you haven't set up a Google places listing in the past then you shouldn't see your company show on the searched list. As you can see in the picture above there is a few similar companies, one of which based down in England and the other in America which means we can go ahead and create our listing. Once your happy that your business isn't already displayed click on the button that says "None of these match" which will take you to the next stage of your Google places setup. 
This part of the process is where you enter all of your companies information. Make sure to fill all of these out in great detail as this is what will be shown to the public on your visible map listing. Everything here is pretty straight forward here and make sure you add the relevant category that your company fits into. Now click "Continue" 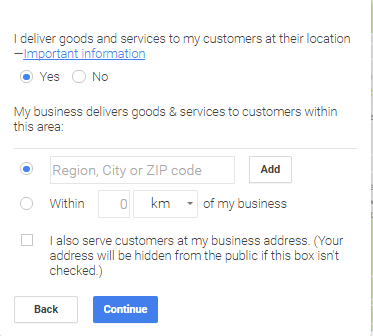
In the coffee shops case, it won't be delivering goods and services to the customer's location but if your company does then you'll be shown the box above when you click continue. All you have to do here is enter the locations that you deliver to and you can enter the exact distance you cover in kilometres or miles. You can also hide your business address from the public if you only deliver your services to the customer's address and don't sell from your address directly. 
In the final stage, Google will ask you to verify your business. Tick the box shown above and click "Continue" 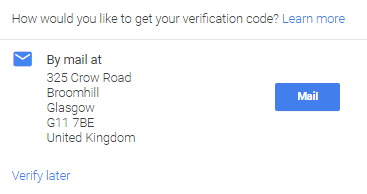
To verify your business you have to enter a verification code that Google will deliver to the address of your business. This code should arrive at the address you listed within about a week or two, which you will then enter into your Google listings page. To send this click on the "Mail" button and that is your initial setup complete.
3. Editing Google Places
Now that you've got your listing finished and you're waiting for the code there is still some details that you need to fill out in order to get the best out of your listing. 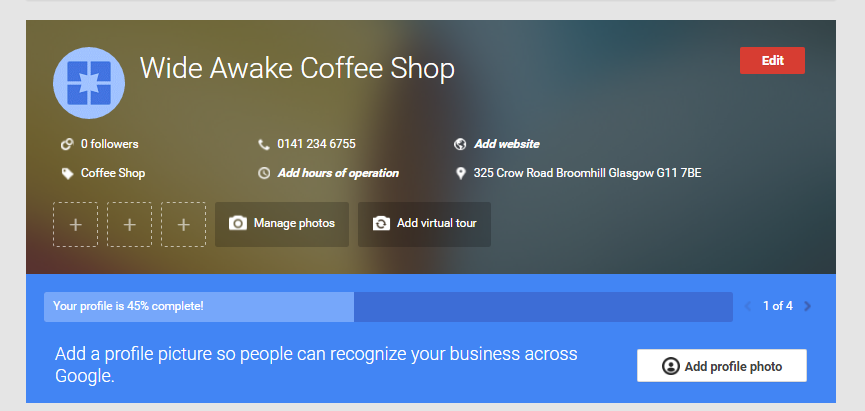
As you can see from the picture above, our profile here is only 45% complete. We want to bring this up to 100% and this can be done with adding just a little extra information. To enter the rest of your details head to the edit section which you can access by clicking the red "Edit" button on the top right.
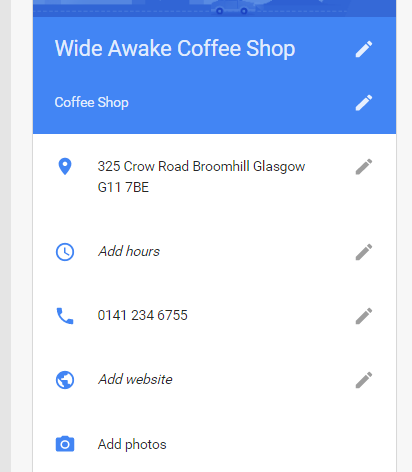
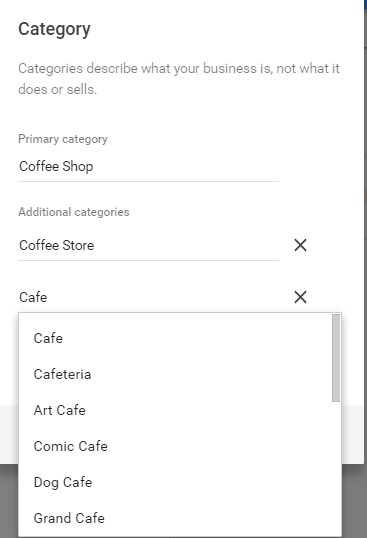
You should try and attribute as many categories as possible to your business as you will want your listing to appear on as many relevant searches as possible. As you can see above the main keyword we have is "Coffee Shop" and I have added in a few others like "Cafe" and " Coffee Store". Whenever you add in extra categories they don't have to be extremely specific but also can't be too loose. For example words like "Cafeteria" is okay to use as a coffee shop does operate in the same way but you couldn't add in "coffee wholesaler" as this isn't actually what the business does. Address - Again this doesn't have to be changed. Add Hours - This area is where you would add your business's opening and closing times Phone Number - Business phone number Add Website - Enter the URL of your website in this section and it will show on your map listing for the general public to click on. Add Photos - The photos for your listing are helpful in showing what your business looks like and shows the general public that you are a legitimate company. 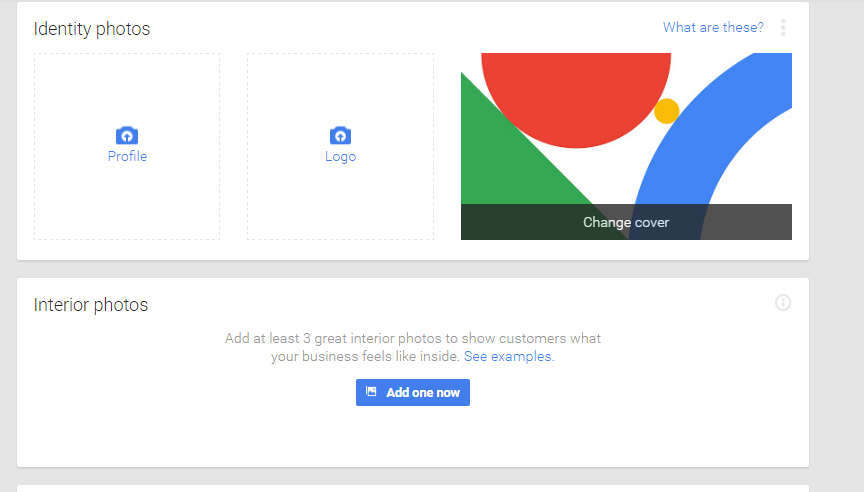
Your profile photo is the one used for the Google places page, so you'll want this to be something along the lines of a logo or a picture of the shop front. The logo is where you would stick the company logo and the cover is really just for design. You also have the option to include interior and exterior photos of your business. I advise that you try and add as many photos as possible to your listing, the more information and pictures you have the more attractive your listing will look on a google search. 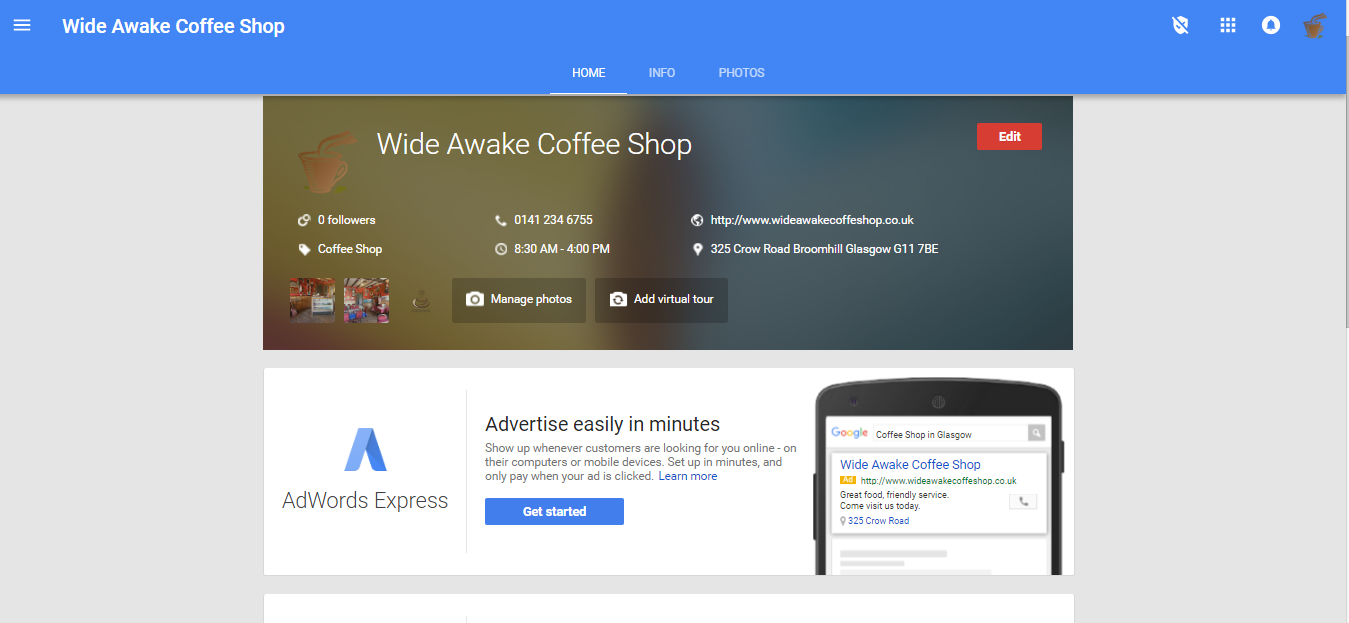
Once you think you've got all the information you need, take a look at the home page and check the percentage of your profile completion. If you have reached 100% the blue bar will have disappeared and you should see a page similar to the one above. Now that everything is complete you can leave your listing until the verification code arrives. (Important: Your listing won't show until you have verified it so make sure you do!). That's everything there is to know about your Google maps listing, there's is really nothing to complicated in setting up your listing, it's just important to take that extra little bit of time to fill out the rest of your information and get the appropriate photos and you'll have a great maps listing for your business.
Video Transcription
So, one of the first things I'll ever do with any website is set up a Google My Business listing. Stats will suggest that there's still a lot of local search out there. Over 40% of all searches are from people looking for something of someone local, so there's a lot of business to be had from having a Google My Business listing and getting yourself positioned on the map pack. At present, that's certainly something I would do for any kind of website. If you offer services or products or whatever locally, then getting this done is one of the first things that you do.
What you do is completely free of charge. You basically go to Google My Business and then click 'start now.' Obviously, it will ask you to give your business name. I'm just going to put in 'Test Business.' Put in your address, post town, postcode. Make sure you fill this out properly and click next.
Where are you located? This is my office address here, so I'm based in Hillington in Glasgow. Whatever you may be, your map listing should come up, but this kind of little marker is not always 100% accurate. If you're anything like me, you've got OCD, make sure at this point you drag the marker to exactly where your office is, because Google's not always 100% accurate when it comes to the maps. Drag the marker to exactly where you are, then click next.
Then choose the category that fits your business best, so 'internet marketing service' is one of them. It does say under there you can add more later, so we'll come back to that. Obviously, what you want to do is put in your telephone number, make sure you select the UK or the US or whatever you may be. Your website URL. You can also get a free kind of Google website based on your info as well, but as always, you want to make sure that you have in your correct website, because I think most cases, you will have a website.
Stay in the know. Would you like to receive communications? I don't think there's any reason why you shouldn't. Tick 'yes,' but if you don't want bombarded with recommendations, then, by all means, click 'no,' but I think it's always good to keep up-to-date, certainly with tips and how to improve your presence. Things change, so it's certainly something I would keep ticked as 'yes.'
Finish and verify this business. Obviously, once you've done this, it will allow new customers to find you in Google search and the maps, promote your business through photos and posts, type your business analytics to understand your customers, and the dreaded customer reviews. We will go into this later on in the course, but obviously, if you set this up, you are opening yourself up to customer reviews. People out there are very, very aggressive these days, and do tend to leave negative reviews even if you've not done anything wrong, so just be wary of that. You click 'finish' and verify this business.
Now in order to fill and manage this, I could get a phone call. Just know, now this is not always the case. In a lot of cases, it will allow you to have a postcard sent to your address, just to verify you are there. You just stick in your name there, click mail, and a postcard will come out to your address. You'll get a pin number and you can go on and verify your listing. I could do that by phone just now. It's important that you do verify your listing. Obviously, you can't fully manage your listing until you're verified anyway, but I'm just going to click later because I don't want to verify a fake business listing. I just want to go straight into how this all works.
Obviously, here it will tell me 'verification needed.' It's got some other stuff here, like 'get custom business emails' and all that kind of stuff. The first thing, though, is to complete your listing. The quick process I gave you there was just me putting in the basic details. Now here is where you can go in and you can add a profile photo, a business description, add your business hours. If you're only open Monday to Friday, you can put in whatever hours you are actually open, because people will obviously look at this and see if your opening times are there or whatever if they have to visit your office. I'm going to close some of these down just now. Click apply.
What you want to do is fill this out with as much information as you possibly can. Add special hours, your website's in there. Advanced information. There's loads of different stuff in here that you can add, including a nice picture. You don't want to have that horrible picture up there. You can add an opening date. You can add photos. You can add a business description. You can do all of this stuff.
Services is the next best thing I would go to as well. Now, you have the ability to add in different services that you provide. You want to, as I say, fill everything out as much as you possibly can, and make sure that you're listing for all the services that you do offer. Someone like me might offer web design and [inaudible 00:06:47] market and paid search and various other stuff as well. You can also enhance your online visibility by getting a 360 experience in your office and stuff like that, which can look quite cool. You can also post on the Google My Business listing, so if you've got anything worthwhile to say, any special deals, then I think ... You're on Google's own platform, and you probably want to be utilizing it to the best you possibly can.
Verify your listing. As I say, make sure you do verify your listing. If you don't, someone else will take it off you. If you've got a good map position that's unverified, then someone will take the listing right off you. They can potentially change the website, the phone numbers, and everything else, and start driving traffic to their website using your listening. So make sure that everything is verified. You can also get reviews and respond to reviews from within your Google My Business listening as well.
The next thing is quite new, which is posts, which [inaudible 00:07:51]. You can feature special offers and all that kind of stuff there. I think it's something worth doing.
Next is just your info. Make sure you do fill that out, as I said earlier.
The next tab down is 'insights.' Now, insights, you have to verify before you can get this, but it will obviously show you how people are engaging with your business and all that kind of stuff.
Reviews will obviously show you your reviews here. You can obviously verify your account so that you can reply.
You can also upload photos of your business. Again, you need verification to do that, but you want to make sure that you fill out nice photos and stuff. Make sure that your account is looking good.
Website is just your website URL. Users, you can add other users here so they can mess about with your listing here. Make sure that you be careful who you put in there, for obvious reasons. You can also add new location. You can get a custom Gmail. You can also create ads through here as well, which will take you through to AdWords if you want to set up an AdWords Express account, or go on and set up AdWords in general, but more about AdWords another point.
You can also manage locations, verify location, link accounts, and stuff like that here as well. But the goal with Google My Business is it's free, easy to use, easy to set up, and can drive a lot of traffic.
That is the basic setup. Just fill it out with loads of nice pictures, and fill it out with as much information as you possible can. That would be you starting to have a good Google My Business listing. In the next module, I will explain how to increase the rankings of your Google My Business listing, get yourself good positions on the maps, and various other bits and bobs. If you want to crack on and do this first and foremost before you go onto the next module.


